Why Bathtub Caulk Fails: Getting to the Root of the Problem
After three decades in the trades, I’ve seen more failed 'quick fixes' than I can count. Here is the thing: most people treat caulking as a cosmetic touch-up. In reality, that bead of bathroom silicone sealant is the only thing standing between your subfloor and thousands of dollars in structural rot. When you see black spots or peeling edges, it’s not just an eyesore; it’s a system failure.
The root causes are usually twofold. First, the original installer likely used a cheap acrylic or 'siliconized' latex product that lacks the flexibility to handle the expansion and contraction of a heavy bathtub. Second, and this is where it gets interesting, they probably didn't account for the weight of a person and forty gallons of water. Without addressing movement, any new caulk is destined to fail within months.
The Science of Joint Movement
What most people miss is that your bathtub isn't static. Whether it’s cast iron, steel, or acrylic, the tub moves when it’s filled. If you apply caulk to an empty tub, the joint is at its narrowest point. When you climb in, the tub settles, stretching that fresh seal to its breaking point. Over time, these microscopic tears allow moisture to seep behind the wall, feeding the mold colonies you’re trying to eliminate.
Preparation: The Step Most Homeowners Rush
The secret to fixing moldy caulk isn't in the application; it’s in the demolition. If you leave even a microscopic film of the old material, the new silicone won't bond. You’re effectively building a house on a foundation of sand. On the other hand, if you prep the surface correctly, that bond will last fifteen to twenty years.
Step 1: Mechanical Removal
Start by using a dedicated caulk removal tool or a plastic putty knife. I tell my crews to avoid metal scrapers on acrylic or fiberglass tubs because one slip creates a permanent gouge. For cast iron or tile, a sharp utility knife works, but you must be surgical. You need to remove every visible chunk. Worth mentioning: if the old caulk is brittle, it’s likely an old-school grout or latex. If it’s stretchy, it’s silicone.
Step 2: Chemical Neutralization
Once the bulk is gone, you’re left with a thin, waxy residue. This is the enemy of adhesion. Use a caulk remover spray to soften the remnants, then scrub the joint with a stiff nylon brush. Something to keep in mind: never use mineral spirits on acrylic tubs, as it can dull the finish. Instead, use denatured alcohol for the final wipe-down. It evaporates quickly and leaves zero residue, providing a pristine surface for the new bathroom silicone sealant.
Step 3: Killing the Mold Spores
If you’re replacing bathtub caulk because of mold, you can't just cover it. Those spores are embedded in the microscopic pores of the grout and tile. Use a mixture of one part bleach to four parts water, or a specialized fungicidal wash. Let it sit for ten minutes, then dry the area completely. Now, the important part: use a hair dryer or heat gun to ensure there is zero moisture trapped in the gap. If the substrate is damp, you’re sealing in the rot.
The Long-Term Solution: The Weighted Application Technique
This is the 'contractor secret' that separates a DIY job from a professional one. To ensure a shower caulking guide actually works long-term, you must simulate the tub’s maximum load during the curing process.
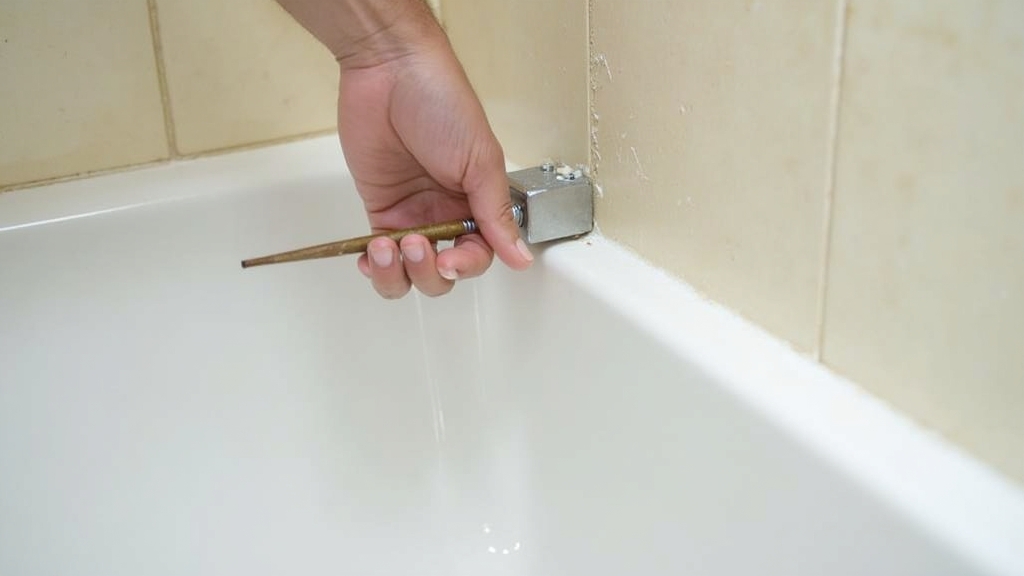
Filling the Tub
Before you open that tube of silicone, fill the bathtub with lukewarm water. Fill it to the overflow drain. This stresses the joint to its maximum width. By applying the caulk while the gap is widest, you ensure the material remains in a state of compression or neutral tension during normal use. This prevents the 'tearing' effect that leads to premature failure.
Choosing the Right Material
Don't settle for 'Kitchen and Bath' blends. You want 100% RTV (Room Temperature Vulcanizing) Silicone. It remains flexible indefinitely and contains high concentrations of mildewcides. The good news is that modern silicones come in various colors to match your grout, so you don't have to settle for 'hospital white' if it doesn't fit your aesthetic.
The Professional Application Process
Setting the Bead
Cut your nozzle at a 45-degree angle. The opening should be slightly smaller than the gap you’re filling. A common mistake is cutting the tip too wide, which results in a messy, oversized bead that’s impossible to tool. Hold the gun at a consistent angle and pull—don't push—the bead along the joint. Consistency in pressure is more important than speed.
The 'Windex Trick' for Perfect Tooling
Pro-grade silicone is incredibly sticky. If you try to smooth it with a dry finger, you’ll end up with a smeared mess. Instead, once the bead is down, lightly mist it with a bit of glass cleaner or soapy water. Dip your finger in the same solution and run it along the bead in one continuous motion. This prevents the silicone from sticking to your skin and leaves a factory-perfect radius. Just be careful not to over-spray; you don't want the liquid getting *behind* the silicone before it bonds to the tile.
When to Call a Professional
While most homeowners can handle a standard recaulking, there are times when you’re out of your league. If you remove the old caulk and find that the wallboard behind the tile is soft or crumbling, you don't have a caulking problem—you have a structural water damage problem. Similarly, if the gap between the tub and the tile is larger than 3/8 of an inch, a standard bead won't hold. This usually indicates the tub has settled or the floor joists are failing, which requires a contractor's intervention.
Long-Term Prevention Strategies
To keep your new seal looking fresh, maintenance is key. After showering, use a squeegee or towel to dry the caulked joints. Mold needs standing water to thrive. Also, ensure your bathroom fan is rated for the square footage of the room and leave it running for 20 minutes after every shower. This lowers the ambient humidity that causes the mildewcide in the silicone to leach out over time.