The Reality of Maintaining a Waterproof Seal
In most homes, the bathtub caulk is the only thing standing between your subfloor and a massive repair bill. From experience, I can tell you that most homeowners ignore their bathroom sealant until it turns black or starts peeling away in chunks. By that point, water has likely already found a way behind the tile.
Over the years, I have learned that re-caulking a tub is one of those tasks that looks deceptively simple on a 30-second social media clip, but requires patience and the right technique to get a professional result. The goal isn't just to make the tub look clean; the goal is to create a long-lasting, waterproof seal that prevents mold growth and structural rot. Whether you should handle this yourself or hire a professional depends on the current state of your shower and your comfort level with tedious prep work.
Understanding the DIY Approach
If you decide to tackle re-caulking your tub as a DIY project, you are taking on a multi-stage process. What I have found is that people spend 10 minutes applying caulk and only 5 minutes cleaning. This is why DIY jobs often fail within six months. To do it right, you must focus almost entirely on the removal of the old material.
The Removal Process
Removing bathtub sealant is the hardest part of the job. You cannot simply apply new silicone caulk over the old stuff. New silicone will not bond to old silicone. You need a sharp utility knife, a plastic scraper tool (to avoid scratching the tub), and a lot of elbow grease. One thing many people overlook is the need for a chemical silicone remover. Even after you scrape the bulk away, a thin film often remains. If that film stays, your new waterproof seal will peel right off.
The Application Phase
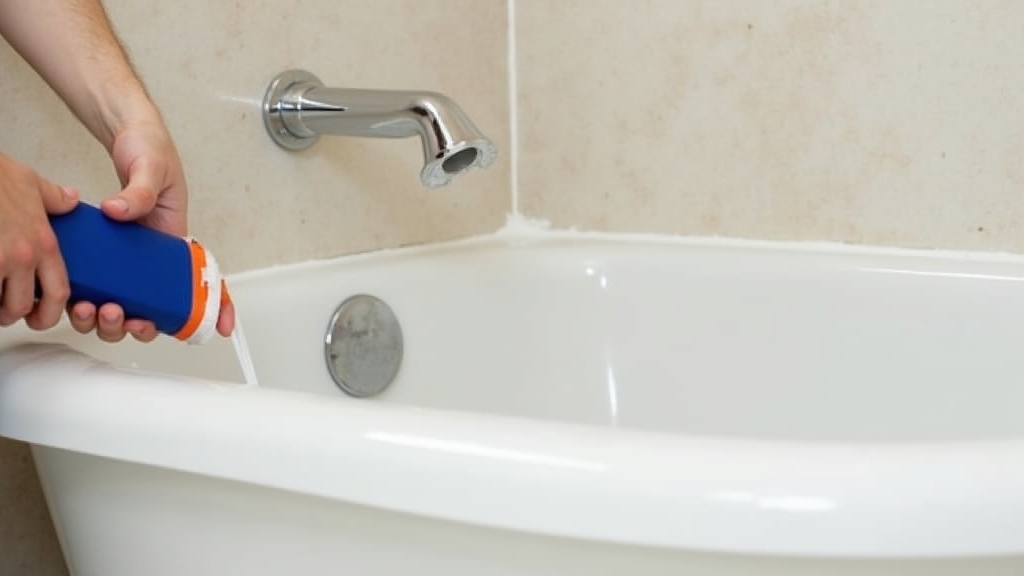
What works best for application is using a high-quality, 100% silicone caulk. Avoid the cheap 'latex with silicone' blends; they shrink and crack over time. In my experience, the biggest mistake DIYers make is cutting the tip of the caulk tube too wide. A small, 45-degree angle cut allows for a controlled bead. You also need a steady hand and a bucket of soapy water or a dedicated smoothing tool to get that clean, concave finish.
The Professional Option
Hiring a professional for a re-caulking job usually involves a handyman or a specialized surface restoration contractor. While it might seem overkill to hire someone for a 'simple' seal, there are reasons why people do it. A pro brings specialized tools, such as oscillating tools with scraper blades, and professional-grade solvents that aren't always available at the local big-box store.
What a Professional Brings to the Table
A common situation is finding mold behind the old caulk. A professional knows how to treat this with biocides before resealing. They also have the muscle memory to lay a perfect bead in one continuous motion, which reduces the number of 'stop and start' points where leaks are most likely to occur. From experience, a pro can finish a tub in about two hours, whereas a first-timer might spend an entire Saturday struggling with sticky residue.
Detailed Pros and Cons
DIY Pros and Cons
- Pro: Cost savings. You only pay for materials, usually under $30.
- Pro: Timeline. You can do it on your own schedule without waiting for a contractor's opening.
- Con: Steep learning curve. It is very easy to make a mess that is harder to clean than the original old caulk.
- Con: Physical strain. Kneeling on a hard bathroom floor for two hours of scraping is tough on the joints.
Professional Pros and Cons
- Pro: Aesthetic finish. A pro bead is smooth, consistent, and looks like it came with the house.
- Pro: Warranty. Many professionals offer a one or two-year guarantee against leaks.
- Con: Cost. Labor rates for a small job like this can feel high because of the travel time involved.
- Con: Scheduling. Finding a reputable contractor willing to come out for just a recaulking job can be difficult.
Cost Comparison
The real issue usually is the value of your time versus the cost of labor. Let's look at a typical breakdown for a standard bathtub alcove.
DIY Estimated Costs
- 100% Silicone Caulk (2 tubes): $18 - $25
- Caulk Gun: $10 - $15
- Scraper Tools and Utility Blades: $10
- Mineral Spirits or Silicone Remover: $12
- Total: $50 - $62
Professional Estimated Costs
- Labor (Flat rate or 2-hour minimum): $150 - $350
- Materials (Usually included): $0
- Total: $150 - $350
What I have found is that if you have multiple bathrooms that need work, hiring a pro becomes much more cost-effective. The 'trip fee' is spread across three tubs instead of one.
Best Use Cases for Each
In my experience, you should DIY if the existing caulk is mostly intact but just discolored, the tub is a standard porcelain or acrylic model, and you have a steady hand. If the caulk is just starting to show its age, it is a great 'entry-level' home maintenance project.
You should Hire a Pro if you see signs of water damage in the room below, if the tub is a high-end jetted model with complex curves, or if the previous homeowner used multiple layers of different types of caulk (like layering silicone over grout). Also, if you have a natural stone shower (like marble), hire a pro. Stone requires non-staining silicone, and if you use the wrong product, you will permanently ruin the stone.
Final Recommendation Based on Situation
The key thing to remember is that prep work is 90% of the job. If you are the type of person who is willing to spend three hours scraping every microscopic bit of old sealant away and then scrubbing the joint with denatured alcohol, you will do a great job. DIY is for the patient perfectionist.
However, if you just want it done and you want it to look like a showroom, hire a pro. Most people underestimate how difficult it is to tool silicone. It sticks to everything except what you want it to. From experience, I always tell friends: if you aren't willing to do the cleaning, don't bother with the caulking. You’ll just be doing it again in three months.