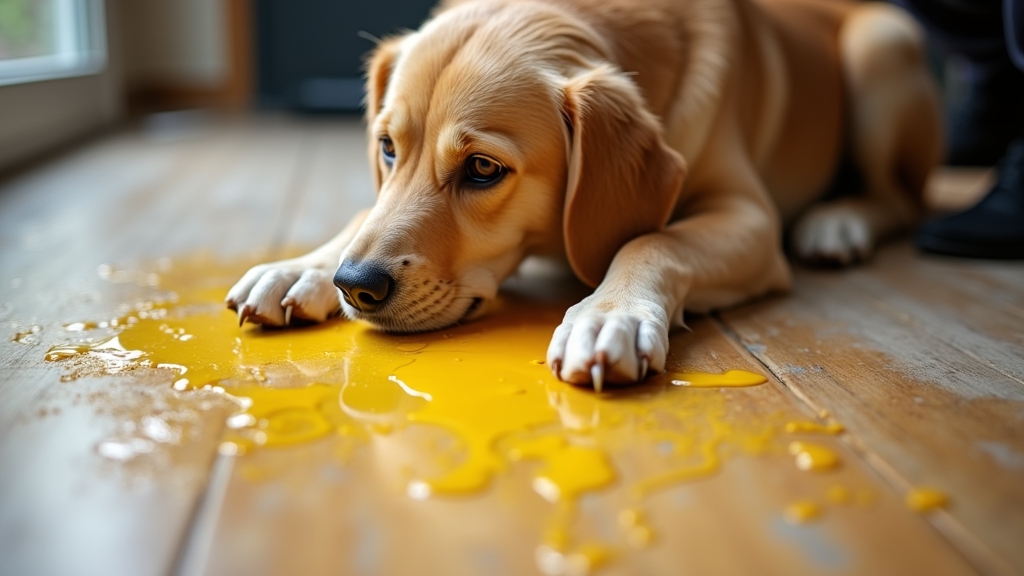
Maintaining a lush, green lawn is a point of pride for many homeowners, but for those with four-legged family members, the appearance of unsightly yellow or brown patches is a common frustration. Often referred to as "lawn burn," these spots are the result of concentrated nitrogen and salts found in dog urine. While the nitrogen in urine is similar to the ingredients in many fertilizers, the sheer concentration in one localized area essentially "burns" the grass blades and can even alter the soil chemistry.
As someone who has managed dozens of properties over the decades, I have seen every temporary fix in the book. Many people try to spray-paint the grass or dump a handful of seed over dead thatch, but these are band-aids that fail within weeks. To truly restore your lawn, you must address the soil health and the root system. This guide will walk you through the process of repairing these spots the right way. It is worth doing right the first time so you don't find yourself repeating the same task every month.
Understanding the Cause of Lawn Burn
Before we pick up a tool, it is important to understand what is happening under the surface. Dog urine is naturally high in nitrogen-containing urea. In small amounts, nitrogen is a vital nutrient for grass. However, when a dog repeatedly uses the same area, the concentration becomes toxic to the plant. This creates a chemical burn that travels from the leaf down to the root. Furthermore, the salts in the urine can dehydrate the soil, making it difficult for new seeds to germinate.
You might notice that the edges of a yellow spot are often bright, dark green. This is because the nitrogen levels at the periphery are diluted enough to actually fertilize the grass, while the center remains the "kill zone." Recognizing this helps you understand why simply watering more isn't always enough once the grass has turned straw-colored.
Tools and Materials Needed
Preparation is the foundation of any successful repair. Take your time gathering these items; having the right materials on hand ensures the job remains efficient and effective.
- Metal Garden Rake: A sturdy rake with stiff tines is essential for removing dead organic matter.
- Hand Trowel: For smaller, localized spots where a large rake is too cumbersome.
- Bucket or Garden Hose: You will need a significant amount of water to flush the area.
- High-Quality Topsoil or Finished Compost: This introduces fresh nutrients and helps balance the soil pH.
- Grass Seed: It is critical to match the species of grass currently in your lawn (e.g., Fescue, Kentucky Bluegrass, or Bermuda).
- Peat Moss or Straw: To provide a protective cover for the new seeds.
- Garden Tamper or a Flat Board: To ensure good seed-to-soil contact.
Preparation Steps
Do not rush the process of preparation. In my experience, most lawn repairs fail because the homeowner was too eager to spread seed. If you do not prepare the site correctly, the new grass will struggle to take root in the contaminated soil.
Assess the Damage
First, determine if the grass is truly dead or just dormant. Gently tug on a handful of the yellow grass. If it pulls out easily with no resistance and the roots look shriveled, it is dead. If there is resistance and the base of the plant still shows a hint of green, it may be recoverable with heavy watering. For the purpose of this guide, we will assume the spot requires a full repair.
Clear the Area
Use your metal rake to aggressively remove the dead, straw-like grass. You want to clear away the "thatch" layer until you can see the bare soil. This is a small detail that matters immensely; grass seed must touch the soil to grow. If it sits on top of dead grass, it will dry out and die before it ever sprouts.
Detailed Step-by-Step Repair Instructions
1. Flush the Soil
The most common mistake is skipping the flushing phase. Even if you remove the dead grass, the concentrated salts remain in the soil. Using a garden hose or a large bucket, saturate the bare spot with water. You want to drench it so that the water penetrates several inches deep. This leaches the excess nitrogen and salts further down into the earth, away from the new root zone. Let the water soak in completely before moving to the next step.
2. Prepare the Seedbed
Once the area is moist but no longer muddy, use your trowel or rake to loosen the top inch of soil. If the soil appears very hard and compacted, remove about an inch of the old dirt and replace it with fresh topsoil or compost. This provides a clean, nutrient-rich environment for the new seeds. Trust your instincts on this—if the soil looks grey and dusty, it needs a boost of fresh organic matter.
3. Sow the Seed
Apply your grass seed evenly across the prepared area. A common error is over-seeding; if the seeds are piled on top of each other, they will compete for limited nutrients and moisture. Aim for a density of about 15-20 seeds per square inch. Once spread, lightly rake the seeds into the soil so they are just barely covered—about an eighth of an inch deep is ideal.
4. Ensure Soil Contact
Use your hand or a flat board to gently press down on the seeded area. This "tamping" ensures that every seed is in firm contact with the moist soil. Without this step, air pockets can form, causing the seeds to dry out prematurely.
5. Apply Protective Mulch
Lightly cover the spot with a thin layer of peat moss or weed-free straw. This layer acts as a blanket, retaining moisture and protecting the seeds from birds. You should still be able to see some of the soil through the mulch; do not bury the seeds under a thick layer of hay.
6. The Watering Schedule
For the first 10 to 14 days, the area must remain consistently moist. This usually requires a light watering twice a day—once in the morning and once in the late afternoon. Avoid heavy spraying that might wash the seeds away. Once the grass reaches about two inches in height, you can gradually reduce the frequency but increase the depth of watering to encourage deep root growth.
Tips for Best Results
Success in property management comes from consistency. To ensure your repair lasts, consider these professional tips:
- Timing is Everything: While you can repair spots any time during the growing season, early spring or early fall are the most forgiving windows. The cooler temperatures and natural rainfall support seedling survival.
- Match the Variety: If you have a dark green Fescue lawn and you patch it with a bright green Rye grass, the repair will stand out like a sore thumb. Take a small sample of your healthy grass to a local nursery if you are unsure of the species.
- The "Dilution" Method: If you see your dog urinating, immediately follow up with a watering can to dilute the spot. This can often prevent the burn from happening in the first place.
- Train to a Specific Zone: Consider creating a small area with gravel or mulch where your pet is encouraged to go. This eliminates the problem at the source.
Troubleshooting Common Issues
If your repair isn't taking, check these common pitfalls:
Seeds Aren't Germinating
This is usually due to one of two things: the soil wasn't flushed enough (remaining salts are killing the seeds) or the area dried out. New seeds cannot survive even a single afternoon of complete dehydration. Re-evaluate your watering schedule.
The Patch is a Different Color
This happens when the seed variety doesn't match or when the soil in the patch is significantly more fertile than the rest of the lawn. Over time, as the nutrients in the new topsoil level out, the color should blend. You can help this by applying a balanced, slow-release fertilizer to the entire lawn.
The Spot Returns Immediately
If the dog continues to use the exact same spot, the repair will fail regardless of how well you did the work. You must temporarily fence off the repaired area or use a pet-safe deterrent to encourage the dog to move to a different location while the new grass establishes itself.