In most homes, tile is the go-to choice for durability, but the grout—that porous, cement-based filler—is almost always the first thing to fail. Over the years, I have learned that grout isn't just a cosmetic border; it’s a functional seal that protects your subfloor and walls from moisture. When it cracks or discolors, it’s a signal that the integrity of your installation is at risk. Mastering grout cleaning and repair is less about elbow grease and more about understanding the chemistry and physics of your home.
Root Causes of Grout Failure and Discoloration
Before reaching for a scrub brush, you must understand why grout fails. From experience, the real issue usually isn’t just 'dirt,' but a combination of environmental factors and installation shortcuts.
Porosity and Lack of Sealing
The key thing to remember is that standard cementitious grout is naturally porous. It acts like a hard sponge. If it wasn't sealed properly upon installation—or if that sealer has worn away—it will absorb dirty mop water, body oils, and soap scum deep into its structure. This is why some stains never seem to come out; they aren't on the surface, they are in the material.
Structural Movement and Settling
If you notice hairline cracks, especially in corners or where the floor meets the wall, the issue is often structural. Houses breathe and shift. What I have found is that many builders use grout in 'change of plane' areas where they should have used color-matched 100% silicone caulk. Grout is rigid; it cannot flex. When the house settles, the grout snaps.
Incorrect Mixing Ratios
One thing many people overlook is how the grout was originally mixed. If too much water was added to the bag during installation, the grout becomes 'soft' once it dries. Over time, this weak structure crumbles under foot traffic or even during routine cleaning, leading to pitting and holes.
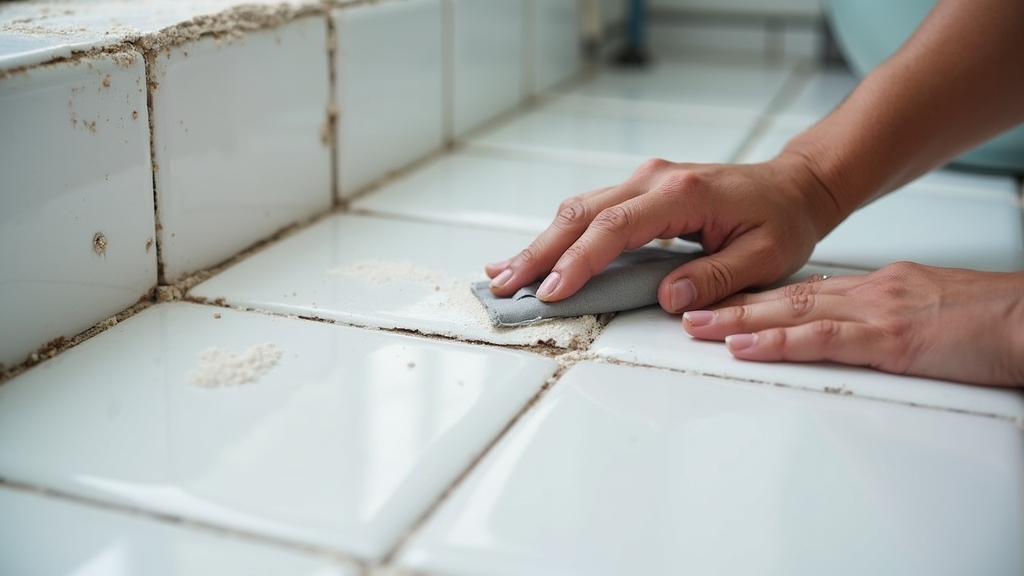
Immediate Steps: Effective Cleaning and Repair
When the damage is done, you need a systematic approach. What works best is starting with the least aggressive method to preserve the grout's integrity.
Deep Cleaning Strategies
In my experience, avoid using pure bleach or vinegar for regular maintenance. Vinegar is acidic and can slowly dissolve the cement binder in grout. Instead, use an alkaline-based cleaner or a dedicated oxygen bleach (sodium percarbonate) solution. Apply the solution, let it dwell for 15 minutes to break down the surface tension, and use a stiff nylon brush. Avoid wire brushes, as they can scratch the tile and gouge the grout.
Repairing Cracked or Missing Grout
A common situation is finding a few inches of missing grout in a high-traffic area. Do not simply smear new grout over the old. It won't bond. You must remove at least 1/8 inch of the old grout using a carbide-tipped grout saw or a multi-tool with a diamond blade. Vacuum the debris thoroughly, dampen the edges to prevent the old grout from sucking the moisture out of the new batch, and then apply your new grout. This ensures a mechanical bond that lasts.
Long-Term Prevention Strategies
The goal is to stop cleaning so often by making the surface impenetrable. From my 15 years of DIY, I’ve found that the 'set it and forget it' mindset doesn't work with tile.
The Importance of Penetrating Sealers
What I’ve found is that 'film-forming' sealers (the ones that make the grout look shiny) eventually peel and trap moisture. Use a high-quality penetrating sealer (impregnator). These soak into the pores and repel oil and water from the inside out. For a kitchen backsplash, I recommend sealing every two years; for a high-traffic shower, every year is more realistic.
Proper Ventilation and Moisture Control
In bathrooms, the real enemy is mold. If grout stays wet for more than a few hours, spores will take root. Ensure your exhaust fan is rated for the square footage of the room and run it for at least 20 minutes after every shower. I also recommend a squeegee for the walls; if the water goes down the drain, it can't sit on the grout.
When to Call a Professional
While most grout issues are DIY-friendly, some situations require specialized equipment. If you are facing 'efflorescence' (a white, salty crust) that keeps returning, you likely have a moisture barrier failure behind the tile. Similarly, if large sections of tile sound hollow when tapped, the thin-set has failed, and no amount of regrouting will fix the underlying delamination. In these cases, a professional tile contractor should assess if a full tear-out is necessary.


