Mastering Hardwood Scratch Repair Throughout the Year
In this guide, you will learn how to identify different types of floor damage, select the right wood floor touch up tools, and implement a seasonal maintenance schedule that keeps your hardwoods pristine. Whether you are dealing with surface-level scuffs or deep gouges that penetrate the finish, these professional-grade techniques will save you from the high cost of a full room sanding.
Why Hardwood Damages Occur: The Seasonal Connection
Here is the thing: your hardwood floor is a living, breathing material. It reacts to the environment just as much as you do. Most homeowners assume scratches are purely accidental—a dropped pot or a pet's claws—but environmental factors play a massive role in how vulnerable your floor is at any given time. During the dry winter months, wood contracts, often leaving gaps where grit can settle and act like sandpaper against the edges of the boards. In the humid summer, the wood expands, and any high spots become primary targets for furniture scuffs.
Now, the important part to understand is that wood floor touch up isn't just about aesthetics; it's about protecting the structural integrity of the timber. Once the protective finish is breached, moisture can seep into the grain, causing permanent discoloration or cupping. This is where it gets interesting—by timing your repairs with the seasons, you ensure the fillers and finishes bond correctly with the wood's natural movement.
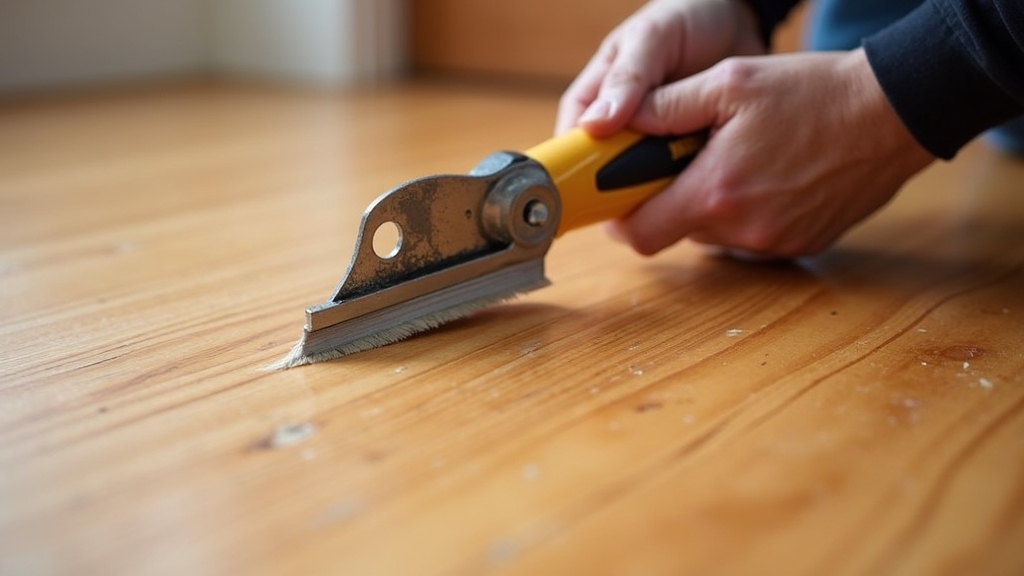
The Professional’s Step-by-Step Scratch Repair Toolkit
1. Identifying the Depth of Damage
Before reaching for a repair kit, you must diagnose the severity. What most people miss is the 'water test.' Place a single drop of water on the scratch. If it beads up, the finish is still intact, and you are likely dealing with a surface scuff. If the water soaks in and darkens the wood, the scratch has penetrated the finish, and you need a more intensive finish repair.
2. Surface Scuff Removal (The Light Touch)
For minor scuffs that haven't broken the stain, the good news is that you don't need heavy chemicals. Start by cleaning the area with a pH-neutral hardwood cleaner. Often, what looks like a scratch is actually 'transfer'—material from a shoe sole or furniture pad sitting on top of the finish. A microfiber cloth and a bit of elbow grease can solve this. If the mark persists, a fine-mist floor wax or a specialized buffing cream can restore the luster without changing the color.
3. Minor Scratches and Color Correction
When the color is gone but the wood isn't gouged, a wood floor touch up marker is your best friend. Something to keep in mind: always choose a shade slightly lighter than your floor. You can always layer color to make it darker, but you can’t lighten it once it’s in the grain. Apply the marker, then immediately smudge it with your finger to blend the edges into the surrounding wood.
4. Deep Gouges and Structural Filling
For deep valleys in the wood, you need a hard-wax filler or a wood-tone epoxy. On the other hand, avoid using basic sawdust and glue; it lacks the flexibility to move with the floor. Melt the wax into the gouge, level it with a plastic scraper to avoid scratching the surrounding area, and once cured, buff it flush. This is where precision matters most to ensure the repair is invisible to the naked eye.
Seasonal Maintenance Schedule for Hardwood Longevity
Spring: The Assessment and Deep Clean
Spring is the ideal time for a full-floor audit. As the light gets brighter, scratches become more visible. This is when you should perform a 'screen and coat' if the entire floor looks dull. Worth mentioning: spring humidity is generally stable, making it the best time for polyurethane finish repair to dry evenly without bubbling or cracking.
Summer: Managing Expansion and Scuffs
With high humidity, your floors are at their tightest. This is when heavy foot traffic causes the most 'edge crushing.' Ensure your AC or dehumidifier is keeping the home between 35% and 55% humidity. During summer, focus on scuff removal from sandy feet and outdoor debris brought in by high-traffic activity.
Fall: Pre-Winter Shielding
Before the grit of winter arrives, apply a fresh layer of high-quality floor wax or a renovator liquid. This acts as a sacrificial layer. This is also the time to replace all felt pads on furniture. What most people miss is that felt pads trap grit over time, turning your chair legs into sanding blocks.
Winter: Grit Control and Gap Management
The biggest enemy in winter isn't the cold; it's the salt and ice melt. These crystals can eat through a finish in a single season. Place heavy-duty mats both inside and outside every entrance. If you notice gaps opening up between boards due to dry air, do not fill them with permanent wood filler—they will simply pop out when the wood expands in the spring.
Practical Tips from the Renovation Frontlines
- The Walnut Trick: For light scratches in natural wood, rub a real walnut meat over the scratch. The natural oils and brown pigment often hide minor marks perfectly.
- Blue Tape Strategy: When performing a finish repair, mask off the surrounding 'healthy' boards. This prevents you from creating a large shiny patch while trying to fix a small dull scratch.
- Lighting is Everything: Always perform repairs with a flashlight held at a low angle to the floor. This 'raking light' reveals the true depth of the scratch and ensures your filler is perfectly level.
Common Mistakes to Avoid
One of the most frequent errors I see is using steel wool on modern pre-finished floors. Most modern floors have an aluminum oxide finish which is incredibly hard; steel wool will create a hazy cloud that is nearly impossible to remove without professional help. Another mistake is using 'oil-soap' cleaners. These leave a residue that prevents future finish coats from sticking, leading to a massive headache when you eventually want to buff and coat the room.


