In most homes built in the last two decades, the open concept layout has become the standard. While the lack of walls creates a sense of space and light, it often introduces a new challenge: a lack of definition. From experience, I have seen many homeowners struggle to make a vast, open area feel cozy and functional. Without clear boundaries, a living room, dining area, and kitchen can bleed into one another, resulting in a space that feels cluttered or unfinished.
What works best is a strategy called 'zoning.' This involves treating specific areas of a large room as independent 'rooms' through visual cues rather than physical walls. In this guide, we will look at how to master the art of defining spaces, focusing heavily on the common mistakes that can ruin an otherwise beautiful floor plan.
Tools and Materials Needed
Before moving any heavy furniture, you should gather a few basic items to help you visualize the new layout.
- Tape Measure: Accurate dimensions are critical to ensuring traffic paths remain clear.
- Painter’s Tape: This is my go-to tool for marking out 'zones' on the floor before committing to furniture placement.
- Graph Paper or Digital Floor Plan App: Sketching the layout helps you see the scale of your furniture relative to the room.
- Area Rugs: These act as the 'anchor' for each zone.
- Lighting Fixtures: Floor lamps, table lamps, or pendant lights to define specific areas.
- Room Dividers or Open Shelving: For creating subtle physical separations without blocking light.
Preparation Steps
One thing many people overlook is the flow of movement. Before you start zoning, you must understand how people move through the space. From experience, if you don't account for 'human traffic,' even the most beautiful furniture grouping will feel frustrating to live with.
Measure the Entire Perimeter
Start by measuring the total square footage of the open area. Note the location of windows, doors, outlets, and permanent fixtures like fireplaces. The real issue usually is trying to force a zone where a natural walkway already exists.
Identify Primary Activities
What will happen in this space? Is it just for watching TV and eating? Or do you need a workspace, a reading nook, and a play area? List these functions in order of priority. What I have found is that trying to squeeze too many zones into one room makes every zone feel cramped.
Map the Traffic Paths
Using your painter's tape, mark out the paths people take to get from the front door to the kitchen, or from the living room to the hallway. These paths should be at least 30 to 36 inches wide. Once these paths are marked, the 'dead spaces' left over are your potential zones.
Detailed Step-by-Step Instructions
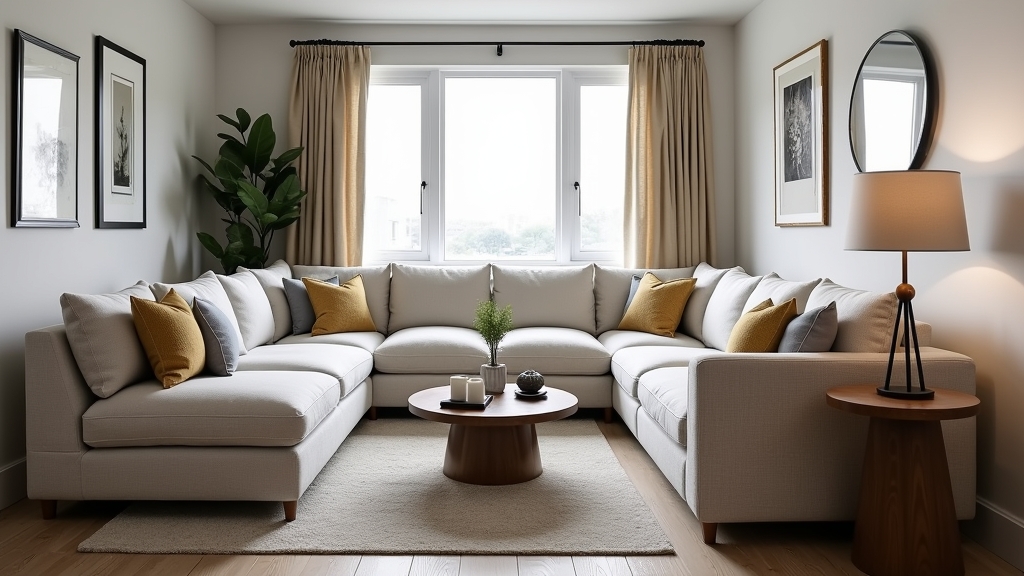
1. Anchor Each Zone with Area Rugs
In my experience, the single most effective way to define a space is with an area rug. A rug acts as a visual 'island.' For the living room zone, ensure the rug is large enough that at least the front legs of all seating furniture rest on it. A common mistake is using a rug that is too small, which makes the furniture grouping look like it's floating aimlessly.
2. Use Furniture Grouping Strategically
Instead of pushing all furniture against the walls—a common habit I see—pull your sofas and chairs toward the center of the zone. Over the years, I have learned that the back of a sofa is a highly effective 'soft wall.' By placing a sofa with its back to the dining area, you create a clear psychological boundary between the two spaces.
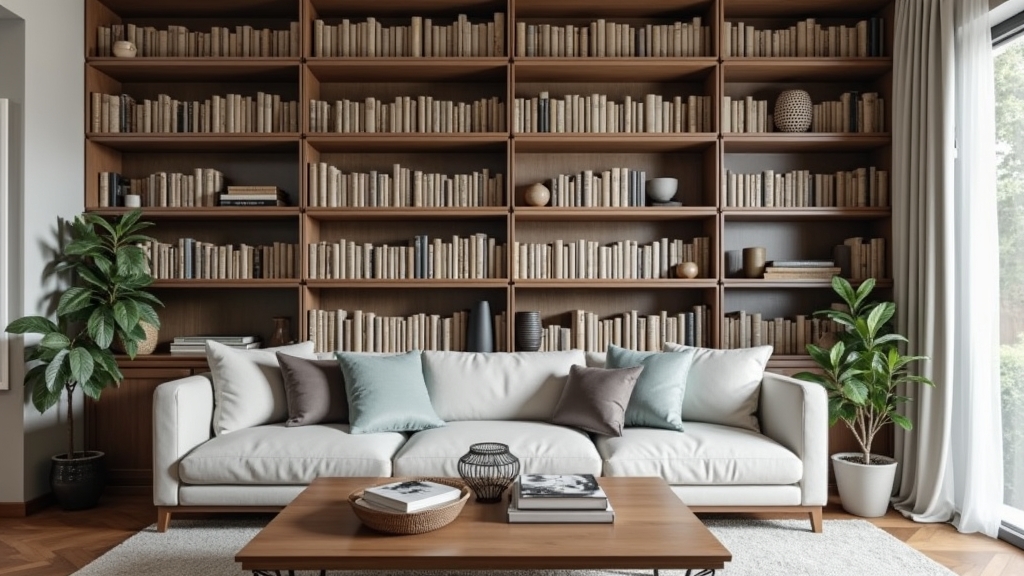
3. Incorporate Room Dividers and Vertical Elements
If furniture grouping isn't enough, consider vertical dividers. Open-backed bookshelves are excellent for this because they provide a physical barrier while allowing light and sightlines to pass through. This maintains the 'open' feel while providing the 'zoning' you need. Avoid solid, ceiling-high dividers as they can make the room feel small and dark.
4. Establish Dedicated Lighting Plans
The key thing to remember is that an open floor plan should not rely on a single overhead light source. Each zone needs its own lighting. A chandelier over the dining table, a floor lamp next to a reading chair, and recessed lighting in the kitchen help define each area when the sun goes down. When you turn off the dining lights but keep the living room lamps on, you are effectively 'closing' the dining room for the evening.
Common Mistakes: Lessons Learned
Mistake 1: The 'Wall-Hugging' Syndrome
A common situation is seeing every piece of furniture pushed against the perimeter walls. This leaves a massive, awkward 'no-man's land' in the middle of the room. It makes the space feel like a gymnasium rather than a home. What works best is creating clusters of furniture that facilitate conversation.
Mistake 2: Ignoring Scale and Proportion
I have seen many homeowners try to use oversized furniture from a previous home in a smaller open-concept space. If your sofa is too large, it will swallow the zone and bleed into the traffic paths. Conversely, tiny furniture in a massive room will look lost. Always check the scale of your pieces against the dimensions of the zone you've marked out with tape.
Mistake 3: Inconsistent Color Palettes
While each zone should be distinct, they must still speak the same visual language. A common mistake is decorating the living zone in a modern industrial style and the dining zone in a traditional farmhouse style. This creates visual friction. Use a cohesive color palette across the entire floor plan, then use accents or textures to give each zone its own personality.
Mistake 4: Blocking Natural Light
When using room dividers or tall furniture, one thing many people overlook is the path of natural light. If you place a tall bookshelf directly in front of a primary window to separate a home office, you may darken the rest of the living space. Always prioritize light flow.
Tips for Best Results
- Use Paint to Define: You don't have to paint the whole room one color. Consider an accent wall within a specific zone to help anchor that area.
- Vary Heights: Use a mix of tall items (like floor lamps or tall plants) and lower items (like coffee tables) to create visual interest and layers.
- Consistency in Flooring: While rugs define zones, keep the primary flooring consistent throughout. Changing from hardwood to tile in the middle of an open space often makes the room feel smaller and 'choppy.'
- The 'Five-Second Rule': When you stand at the entrance of the room, you should be able to identify the purpose of every area within five seconds. If it looks like a jumble of chairs, you need more definition.
Troubleshooting Common Issues
The Space Feels Too Noisy (Acoustics)
Open floor plans often suffer from echoes. The real issue usually is a lack of soft surfaces. If your 'zones' feel loud, add more textiles—heavier curtains, plush rugs, and even fabric-covered room dividers can help dampen sound.
The Zones Feel 'Cluttered'
If the room feels messy despite your efforts, you may have too many small items. Over the years, I have learned that fewer, larger pieces of furniture create a cleaner look than many small pieces. Try consolidating your zones; perhaps the 'reading nook' and 'living room' can become one larger, multi-functional area.
The Lighting is Inconsistent
If one area feels like a cave while another is blindingly bright, check your 'layers' of light. Every zone needs a mix of ambient, task, and accent lighting. Make sure your light bulbs have the same 'color temperature' (measured in Kelvins) to ensure the space feels unified at night.