Professional Landscape Lighting Overview
In most homes, outdoor lighting is treated as an afterthought—a few solar stakes from a big-box store shoved into the dirt. However, after a decade of fixing these systems, I can tell you that a professionally installed low-voltage system is what truly transforms a property. What we are aiming for here is not just visibility, but 'ambiance and security' without the blinding glare. In this guide, I will walk you through the process of installing a 12V low-voltage system, which is the industry standard for safety, ease of installation, and longevity.
Essential Tools and Materials
From experience, the difference between a system that lasts ten years and one that fails after the first rain is the quality of the connections and the gauge of the wire. Do not skimp on the transformer or the connectors.
The Tool Kit
- Sharpened Trenching Shovel: A clean edge makes cutting through turf easier.
- Wire Strippers: Look for a pair that handles 12-gauge and 14-gauge landscape wire specifically.
- Digital Multimeter: Essential for checking voltage at the end of the run.
- Rubber Mallet: For driving stakes without shattering the fixture housing.
- Voltage Tester: To ensure your power source is active.
Required Materials
- Low-Voltage Transformer: Choose one with a stainless steel housing and a built-in timer or photocell.
- Direct-Burial Wire: 12/2 gauge is the standard for most residential runs under 100 feet.
- Waterproof Wire Connectors: Silicone-filled 'nuts' are mandatory. Never use standard electrical tape.
- LED Fixtures: Brass or copper housings outperform aluminum every time in coastal or high-moisture environments.
Preparation and Design Strategy
One thing many people overlook is the 'total wattage' calculation. Before you dig a single hole, you need to map out your zones. In my experience, the real issue usually is voltage drop—where the lights at the end of the wire are dimmer than the ones at the beginning. To avoid this, I recommend the 'T-Method' or 'Hub Method' of wiring rather than a simple daisy chain.
Calculating Your Load
The key thing to remember is the 80% rule: never load a transformer to more than 80% of its rated capacity. If you have a 300-watt transformer, do not exceed 240 watts of total bulb output. With modern LEDs (usually 3W to 7W per fixture), this allows for massive systems on a single transformer, but you still need to account for wire resistance.
Step-by-Step Installation Guide
1. Transformer Placement
What works best is mounting the transformer near an outdoor GFCI outlet at eye level. This makes programming the timer much easier. Ensure it is at least 12 inches above the ground to prevent splash-back from rain and snow accumulation.
2. Laying Out the Fixtures
Place your fixtures on top of the ground exactly where you want them. A common situation is finding that a beautiful tree looks better with 'up-lighting' from two sides rather than just one. This 'mock-up' phase allows you to adjust the beam angles before any wires are buried.
3. Trenching the Wire
You don't need to go deep. In most residential applications, 6 inches is plenty. Over the years, I have learned that if you use a flat-edge spade to create a 'V' notch in the turf, you can tuck the wire in and step the grass back down, leaving almost no trace of the installation.
4. Making the Connections
This is where most DIY projects fail. Strip about 3/4 inch of insulation from your wires. Twist the wires together and cap them with silicone-filled waterproof connectors. I’ve seen hundreds of systems fail because of the 'clip-on' connectors that come with cheap kits; they eventually corrode and sever the wire. Cut them off and use proper waterproof nuts instead.
5. Testing and Aiming
Turn the system on at dusk. This is the only time you can properly aim the fixtures. Avoid 'hot spots' on the siding of the house and ensure you aren't blinding neighbors or drivers. Use the multimeter to check the last fixture on the run; you want to see between 10.5V and 12V for optimal LED performance.
Common Mistakes to Avoid
From my 10+ years in the field, these are the 'value killers' that I see homeowners make repeatedly:
- The Airport Runway Look: Spacing path lights exactly 6 feet apart in a straight line. It looks clinical. Stagger them for a more natural, inviting feel.
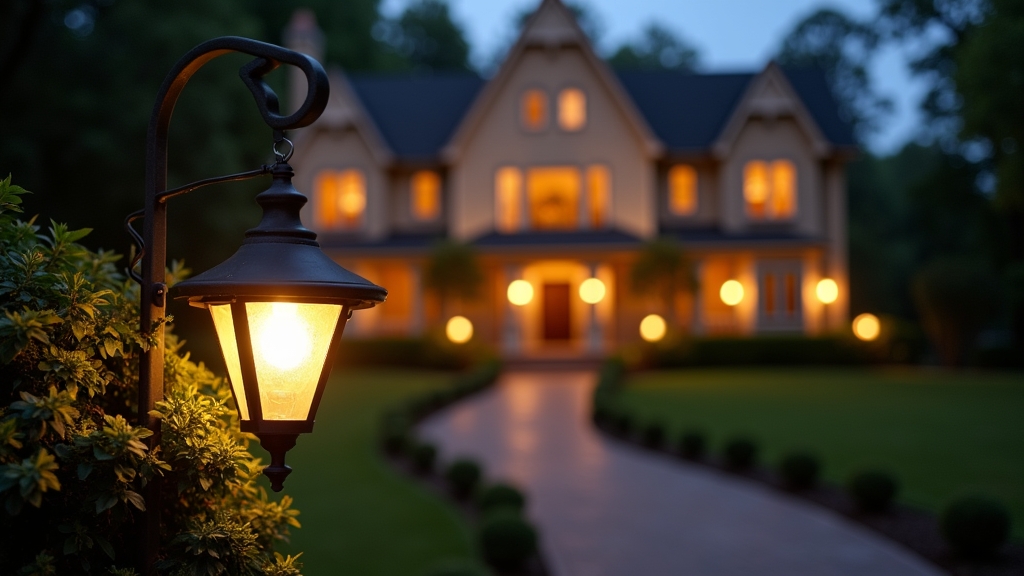
- Wrong Color Temperature: 5000K (Daylight) bulbs make your garden look like a gas station. What I have found is that 2700K (Warm White) provides that high-end, resort-style glow.
- Ignoring the Trees: People focus only on the ground. 'Moonlighting'—placing a fixture high in a tree and aiming it down—creates a stunning effect that mimics natural light.
- Overtightening Screws: Thermal expansion happens. If you crank down the set screws on your fixtures, the glass covers may crack in the winter.
Troubleshooting Common Issues
If your system doesn't turn on, don't panic. The real issue usually is the GFCI outlet. Check the 'Reset' button on the outlet the transformer is plugged into. If only half the lights are working, you likely have a severed wire mid-run or a loose waterproof nut. Using your multimeter, you can 'bridge' segments of the wire to find exactly where the continuity breaks. In my experience, it’s usually where someone recently did some gardening or edging.
Maintenance for Longevity
At least twice a year, walk your property. Clean the lenses of your fixtures with a soft cloth and mild soap; hard water deposits can cut light output by 50%. Trim back any foliage that has grown over the fixtures. These small steps ensure your 'garden lights' don't become buried treasure within two seasons.


